In my continued efforts to overcome my dinner-cooking rut, I created a new soup recipe that was inspired by a recipe I saw on The Cottage Home blog. Alex seemed to enjoy it and Natalie chowed down on some after I put it in the food processor. Actually, it looked like her bib ate more than she did, but that's what happens when Daddy tries to feed her. Hehehe!
Chicken, Rice and Veggie Soup
Whole fryer (or 4 boneless, skinless chicken breasts)
6 carrots
1 med onion
4 stalks of celery
2 cups long-grain brown rice
6 chicken bouillon cubes
salt & pepper to taste
Boil whole fryer for 2 hours. Let cool and remove meat from the bone. You could save time and cook chicken breasts in a pan and then cube or shred it if you preferred. Saute carrots, onion and celery in a pan with olive oil until carrots are soft. While vegetables are cooking, cook rice according to package directions (mine took about an hour to cook). I strained the chicken broth and then used it as a base to my soup, but you could use a few boxes of broth from the store. I added bouillon, salt and pepper for flavor. Once rice and veggies are cooked, throw them and the chicken into the broth and heat to a simmer. I pureed several cups of soup to freeze for Natalie, Alex and I each ate a bowl and there were 4 quarts of soup left over.
Showing posts with label homemade. Show all posts
Sunday, October 21, 2012
Sunday, June 5, 2011
I'm A Basket Case
A dear friend recently arranged for a lady from our church to teach a basket weaving class for 9 eager women and girls. I didn't know that people still made their own baskets until last summer when my college roommate received a gorgeous hand woven basket from her future husband's grandmother as a wedding shower gift. I was instantly intrigued to say the least.
The class lasted 5 hours, plus an extra hour at the end to stay and talk, as we women love to do! Here's how the project progressed:


I think it's safe to say that we all left the class addicted to basket weaving. It's very therapeutic! Now I just have to find the perfect spot in the house for my basket...
The class lasted 5 hours, plus an extra hour at the end to stay and talk, as we women love to do! Here's how the project progressed:
I think it's safe to say that we all left the class addicted to basket weaving. It's very therapeutic! Now I just have to find the perfect spot in the house for my basket...
Monday, March 28, 2011
Eco-Easter T-Shirt Bags
After whipping up my first t-shirt bag without a hitch, I headed to Goodwill to see what I could find to make bags for our nieces and nephew. It took just 30 minutes to make 4 bags. How's that for a quick and easy sewing project?! Here's how they turned out:

The little knots on the shoulders were made out of the shirt sleeves since I found long-sleeved shirts for the older girls. The princess shirt was a hooded sweatshirt.

Strawberry Shortcake was a pajama top.

(I didn't want to lose the purple ruffled trim on this one, so I stitched it closed on the outside instead of turning it inside out.)

Sky has graduated from infatuation with Spiderman to quite an interest in Transformers.
On one hand, they just look like tank tops, but once you hold them up as bags I think they're a lot cuter. Now to get the Easter eggs ready for hunting!
The little knots on the shoulders were made out of the shirt sleeves since I found long-sleeved shirts for the older girls. The princess shirt was a hooded sweatshirt.
Strawberry Shortcake was a pajama top.
(I didn't want to lose the purple ruffled trim on this one, so I stitched it closed on the outside instead of turning it inside out.)
Sky has graduated from infatuation with Spiderman to quite an interest in Transformers.
On one hand, they just look like tank tops, but once you hold them up as bags I think they're a lot cuter. Now to get the Easter eggs ready for hunting!
Sunday, March 27, 2011
T-shirt Bag Tutorial
I'm putting together an Easter egg hunt for our nieces and nephew again this year and was on the hunt for a thrifty easter basket/bag/bucket idea. I bought $1 buckets last year and they were ok, but I didn't really want to buy something like that again since they end up getting thrown away. A friend found an idea in a kids magazine that I fell in love with instantly: a t-shirt bag. Before I went to Goodwill to buy shirts for the kids' bags, I did a test run using an old t-shirt I already had. The logo on it is for our children's ministry at church, so I made it to give to the children's pastor's wife. Start with a shirt (can be long or short-sleeved) and cut off the sleeves and collar and trim off the bottom hem if you want to make the bag shorter. I've found that it helps to turn the shirt inside-out so you can more easily see to cut all the hem off. Jersey knit doesn't fray, so you don't have to worry about having raw edges!

With the shirt inside-out, straight stitch across the bottom of the shirt:

Using the neck hole, turn it right-side out.

Voila! The arm holes are now the handles of your bag! I added ribbon bows to the handles for a little decoration and to make it look a little less like a t-shirt.

I think I'm going to dig around for some more shirts so I can make reusable shopping bags. Stay tuned for the Eco-Easter Edition of the t-shirt bag! I found some cute shirts for the kiddos!
With the shirt inside-out, straight stitch across the bottom of the shirt:
Using the neck hole, turn it right-side out.
Voila! The arm holes are now the handles of your bag! I added ribbon bows to the handles for a little decoration and to make it look a little less like a t-shirt.
I think I'm going to dig around for some more shirts so I can make reusable shopping bags. Stay tuned for the Eco-Easter Edition of the t-shirt bag! I found some cute shirts for the kiddos!
Sunday, December 19, 2010
Christmas Cards 2010
My computer has been giving me trouble lately, so my computer-nerd hubby is going to reinstall Windows soon. I figured I'd better blog one last time before he does that since I may or may not have access to my photos any time soon if he doesn't get it all worked out right away (I know, all you Mac lovers out there never have problems like this. Rub it in.). I need to finish making our Christmas cards tonight so I can mail them out tomorrow for our family out of state. Because I LOVE Stampin' Up's medallion stamp so much, I had to use it for our cards!

I found this card idea/color combo while Googling images of the medallion stamp. I used Versamark to stamp the design and then used white embossing powder to make it stand out. It kind of looks like a snowflake, I think. Now, if only we'd get some more snow and have a white Christmas this year! Fingers crossed! I finally finished my shopping yesterday. Are you ready for your holiday festivities?
Thursday, December 9, 2010
A Homemade Christmas Part 4
Today is the last part of the Homemade Christmas "mini-series". You survived! ;) This last gift was probably the most fun to make because what started as a simple ruffled skirt for my five-year old niece ended up as a skirt with a cute bow and a matching hair clip and purse. Of course, I can't take all the credit, because a friend gave me a LOT of supplies, made the rosette for the hair clip and suggested that I make a purse. Two really are better than one. I love it when a second person can add to ideas that you already have and then the end result becomes way better than you originally imagined. I hope Caitlin enjoys her new flirty skirt and accessories! And, I must add, that I reeeeeeeally wanted to ask Alex to model the hair clip and purse for your entertainment pleasure, but I just didn't have the guts to subject him to that. What a great photo that would have been for some Christmas cards! :)

Hair clip:

And because every girl needs a matching purse:

I'm getting more in the Christmas spirit with each passing day. Christmas will be here before we know it! Now I have to make and mail cards, mail gifts and wrap presents!
Hair clip:
And because every girl needs a matching purse:
I'm getting more in the Christmas spirit with each passing day. Christmas will be here before we know it! Now I have to make and mail cards, mail gifts and wrap presents!
Tuesday, December 7, 2010
A Homemade Christmas Part 3
Welcome back! I can't believe that the year is almost over! Why does time go by faster and faster the older you get? I'm not so sure that I like it...
Before I show you my next sewing project, I have a confession to make. I'm not entirely in the Christmas spirit. There. I said it. Don't throw things at me! I've decided that I really don't like Christmas music unless it's instrumental only. Well, I'll make an exception for certain classic songs, but don't give me any of the stuff by Brittney Spears or anything like that. My halls aren't decked with holly and I don't turn on my tree lights in order to save electricity (Alex has always been the tree light Nazi. He wants them on all. the. time.). I haven't even baked the first batch of Christmas cookies or candy and I really don't want to. In fact, I'm craving Sour Patch Kids instead. But, despite my lack of traditional Christmas spirit, I am really in the giving mood. It's been fun to try and find the perfect gifts to give loved ones. I've so deeply enjoyed sewing these gifts for the kids and learning more about sewing that I want to do it all year long. I especially want to keep making stuffed animals like the ones that I made for our youngest nieces. Remember the lion and the cat stuffed animals? Well, I wanted to try my hand at another animal, so I made little Kalei a bunny rabbit. This is the first animal that I've made entirely on my own, but I did have guidance from a friend when I appliquéd the face. The zig-zag stitch is very scary, if you ask me!


The face and inside of the ears is soft, fuzzy fabric perfect for cuddling up with. I hope Kalei enjoys playing or snuggling with this little friend!
Before I show you my next sewing project, I have a confession to make. I'm not entirely in the Christmas spirit. There. I said it. Don't throw things at me! I've decided that I really don't like Christmas music unless it's instrumental only. Well, I'll make an exception for certain classic songs, but don't give me any of the stuff by Brittney Spears or anything like that. My halls aren't decked with holly and I don't turn on my tree lights in order to save electricity (Alex has always been the tree light Nazi. He wants them on all. the. time.). I haven't even baked the first batch of Christmas cookies or candy and I really don't want to. In fact, I'm craving Sour Patch Kids instead. But, despite my lack of traditional Christmas spirit, I am really in the giving mood. It's been fun to try and find the perfect gifts to give loved ones. I've so deeply enjoyed sewing these gifts for the kids and learning more about sewing that I want to do it all year long. I especially want to keep making stuffed animals like the ones that I made for our youngest nieces. Remember the lion and the cat stuffed animals? Well, I wanted to try my hand at another animal, so I made little Kalei a bunny rabbit. This is the first animal that I've made entirely on my own, but I did have guidance from a friend when I appliquéd the face. The zig-zag stitch is very scary, if you ask me!
The face and inside of the ears is soft, fuzzy fabric perfect for cuddling up with. I hope Kalei enjoys playing or snuggling with this little friend!
Monday, December 6, 2010
A Homemade Christmas Part 2
My second Christmas project was a tool belt for our nephew, Sky. He is quite the little handy man, even at 5 years old! I came up with the pattern on my own and put it together with a little experimentation. The main fabric (red) is heavy weight canvas from JoAnn's and the striped fabric was leftover from the play tent that I made for his birthday. It is actually a piece from the top of one of the bed sheets that I chose it because of the horizontal stripe detail and the finished edges, which meant less hemming for me! I also had some blue ribbon leftover from the tent as well, which were perfect for the ties. Here's how it turned out:


I'd like to get his name monogrammed across the top in the middle of the horizontal stripes to finish it off. My mom is looking for some kid-sized real tools to accompany this gift for Christmas. I hope Sky likes it!
Sunday, December 5, 2010
A Homemade Christmas Part 1
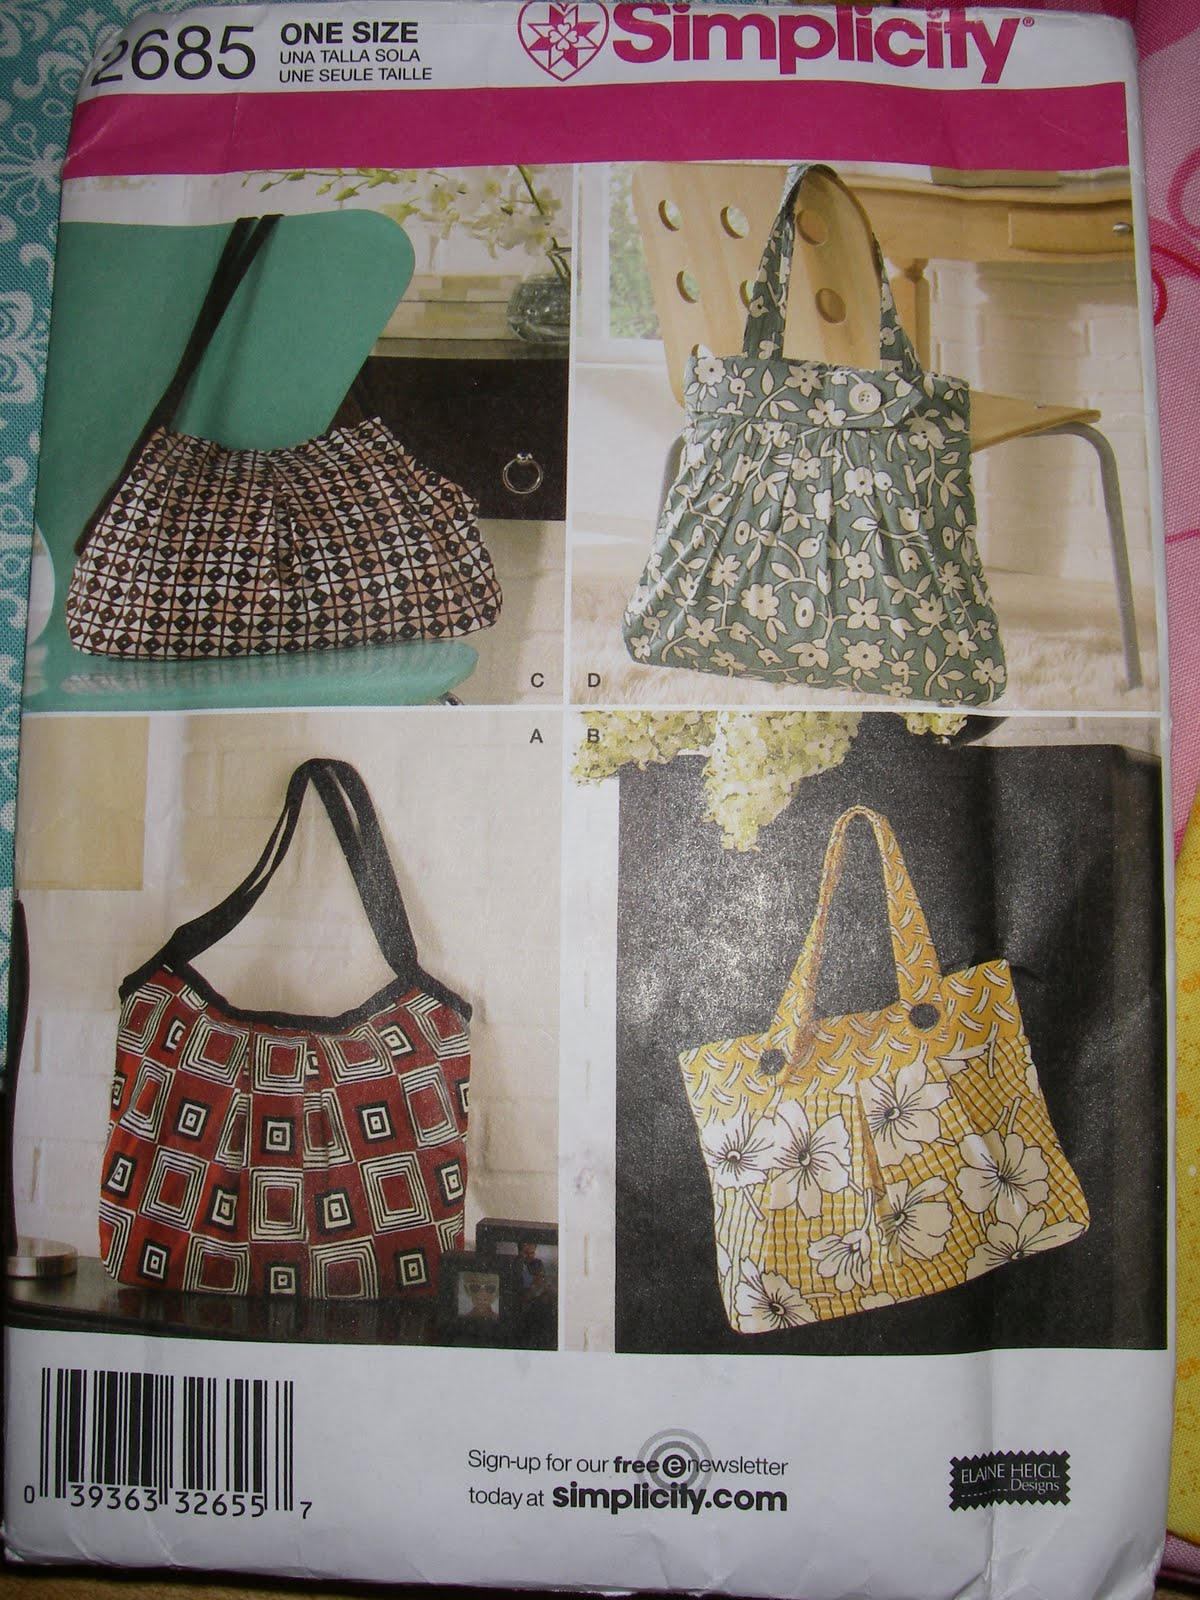
As I've said before, I'm making gifts for our nieces and nephew for Christmas this year. By the end of my vacation (Why does it have to end!? Back to work tomorrow...), I had finished gifts for all the kids. I thought I'd show you one gift a day for the next few days so as not to overwhelm you with pictures all at once (and it's motivation for me to blog more!). The first gift I finished was a tote bag for my oldest niece, Ashley. She's only 7, but she picked out the pattern and, as it turns out, the bag is as big as she is! I hope she likes it and can use it for many years to come!
Pleated front

Button detail

Inside (I couldn't find the right shade or brown, pink, or turquoise to line it with, so I went with boring white)

Here's the pattern I used, on sale at Hobby Lobby for .99 cents! Sure beats Wal-Mart's price of $8 or $9!

Stay tuned to more sewing projects throughout the rest of the week!
Pleated front
Button detail
Inside (I couldn't find the right shade or brown, pink, or turquoise to line it with, so I went with boring white)
Here's the pattern I used, on sale at Hobby Lobby for .99 cents! Sure beats Wal-Mart's price of $8 or $9!
Stay tuned to more sewing projects throughout the rest of the week!
Thursday, November 11, 2010
Happy Veteran's Day and Some Wall Art
Thank you to all our military, past and present, that have given their lives to protect our country's freedom! And thank you to all the military families who also sacrifice by moving where every duty calls and enduring long separations from loved ones. You are all heroes in my book.
Today is Veteran's Day and I'm off work. I'm glad that banks observe this holiday because I was excited to get away from the piles of tax returns sitting on my desk ;) I went to a friend's house, whom I happen to work with, to cut out a saying for her foyer wall. She's been planning for weeks how she wanted it to look and I finally came up with something she liked. After four hours or so, this is what we ended up with:

Having to cut it out in 4 sections and then piece it all together was hard, and I don't think that all the words are perfectly level, but by the end, I was too tired to try and fix it. Beverly was able to straighten it out after I left (she's brave to attempt that!) This is another design we made a few weeks ago:

She has always loved this little saying because she has three dachshunds that are, of course, long and short and oh so cute! I'm vinyl wall decor-ed out! Nap time! Well, more like clean-the-house-so-Alex-doesn't-come-home-from-work-and-think-I've-been-lazy-all-day time. Maybe I'll get a nap in this weekend. A girl can dream!
Today is Veteran's Day and I'm off work. I'm glad that banks observe this holiday because I was excited to get away from the piles of tax returns sitting on my desk ;) I went to a friend's house, whom I happen to work with, to cut out a saying for her foyer wall. She's been planning for weeks how she wanted it to look and I finally came up with something she liked. After four hours or so, this is what we ended up with:
Having to cut it out in 4 sections and then piece it all together was hard, and I don't think that all the words are perfectly level, but by the end, I was too tired to try and fix it. Beverly was able to straighten it out after I left (she's brave to attempt that!) This is another design we made a few weeks ago:
She has always loved this little saying because she has three dachshunds that are, of course, long and short and oh so cute! I'm vinyl wall decor-ed out! Nap time! Well, more like clean-the-house-so-Alex-doesn't-come-home-from-work-and-think-I've-been-lazy-all-day time. Maybe I'll get a nap in this weekend. A girl can dream!
Saturday, August 21, 2010
My New Favorite Thing
I splurged recently and bought Stampin' Up's Medallion background stamp. It came in on Friday and I loved it even more in person than in the catalog. A co-worker's birthday is coming up soon and I wanted to make her a card. Here's how it turned out:

I'm in love with this medallion! Ahhh! A friend suggested I go ahead and make another duplicate card to have on hand for future use so I made this one:

I'll fill in the blank spot with whatever phrase fits the occasion when I need the card. I saw a beautiful Christmas card that used this stamp, so I think I have my inspiration for my cards this year! Happy crafting!
I'm in love with this medallion! Ahhh! A friend suggested I go ahead and make another duplicate card to have on hand for future use so I made this one:
I'll fill in the blank spot with whatever phrase fits the occasion when I need the card. I saw a beautiful Christmas card that used this stamp, so I think I have my inspiration for my cards this year! Happy crafting!
Wednesday, August 18, 2010
"G" Monogram
I saw this idea on a vinyl wall decor website a few months ago and knew that I had to make one myself. Big Lots had 12x12x1 inch canvases for $5, so I snatched one up and created this:

I had some paint left over from the living room and painted the canvas. Then I used Sure Cuts a Lot to cut the image out in vinyl on my Cricut and then mod podged over it so it wouldn't come off the canvas. Total project cost: $6. I'm totally diggin' this thrifty decor stuff! I can't stop searching for ways to save money by doing projects myself instead of spending top dollar at a store to get the same thing. This type of monogram cost $40 on one website. Now I'm making one for my in-laws to hang on their garage. I'll post pictures when it's done.
Subscribe to:
Posts (Atom)